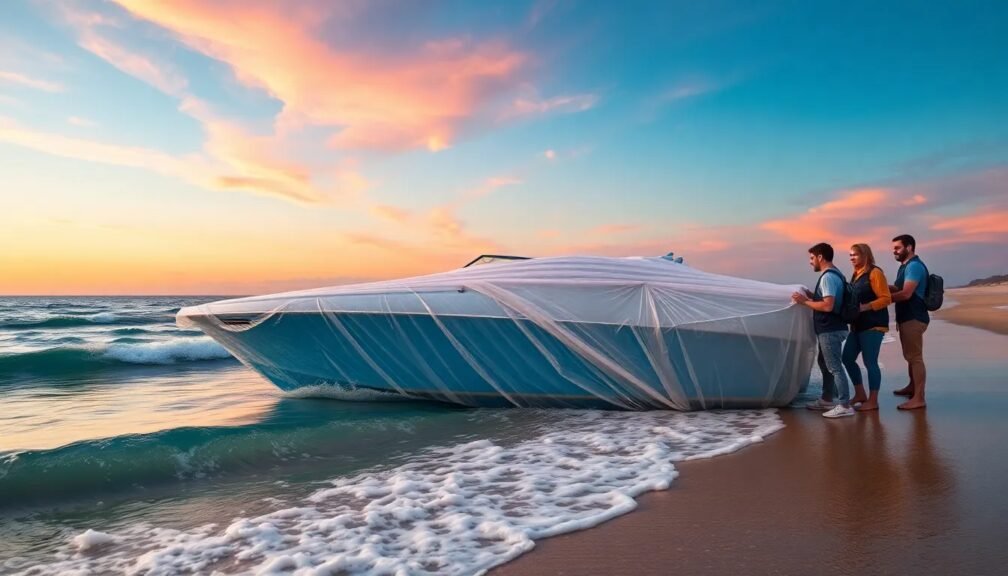
Boat shrink wrapping is an essential process for boat owners looking to protect their vessels during off-seasons or harsh weather conditions. This method not only helps keep your boat safe from the elements but also prevents damage from dust, dirt, and pests. In this article, we’ll explore why boat shrink wrapping is vital, the materials you need, the step-by-step process, and expert tips for a successful DIY experience. Let’s dive into the world of boat shrink wrapping!
Why Boat Shrink Wrapping is Important
Boat shrink wrapping is a popular choice among boat owners for several reasons:
Protection from Environmental Elements
Shrink wrap acts as a shield against harmful UV rays, rain, snow, and ice. These elements can cause fading, mold growth, and structural damage over time.
Pest and Rodent Prevention
Protected from the outside, your boat is less likely to attract rodents or insects that can wreak havoc on sensitive components.
Cost-Effective Solution
Investing in high-quality shrink wrap and materials is generally less expensive than repairs caused by neglect. It’s a small price to pay for peace of mind.
Easy and Efficient
Unlike other cover options that may not fit all boats perfectly, shrink wrap adapts to your boat’s shape, providing a snug fit without gaps.
Materials You’ll Need for Boat Shrink Wrapping
Before you commence your boat shrink wrapping project, ensure you have the following materials:
1. Shrink Wrap Film
The most important material is the shrink wrap itself. Typically, a 6-mil to 12-mil thickness is recommended for boats. The thicker the film, the more durable it is against harsh conditions.
2. Shrink Wrap Kits
These kits often come with everything you need, including the film, heat gun, and accessories. Opt for a kit tailored to your boat size for convenience.
3. Supports and Filler Materials
Supports, such as frames or poles, help create a structure that prevents rain or snow from pooling on top of the wrap. Filler materials like bubble wrap can protect sensitive areas.
4. Heat Gun
A heat gun is essential for the shrink wrapping process, allowing you to evenly shrink the material to form a tight seal.
5. Tools
Basic tools such as scissors, utility knives, and tape are required to cut, secure, and finish the wrap.
Step-by-Step Process of Boat Shrink Wrapping
Now that you have your materials, it’s time to go through the step-by-step process of boat shrink wrapping.
Step 1: Prepare Your Boat
Before you begin the shrink wrapping process, clean your boat thoroughly. Remove any dirt, debris, and mildew to ensure a smooth surface. Check for any repairs needed and address them prior to wrapping.
Step 2: Assemble Your Framework
Create a frame using PVC pipes, wooden stakes, or commercially available support kits. This framework should allow rainwater to run off easily and prevent pooling or sagging.
Step 3: Cut the Shrink Wrap
Measure your boat and cut the shrink wrap film, leaving a few extra feet to ensure complete coverage. If you’re using a shrink wrap kit, follow the manufacturer’s guidelines for sizing.
Step 4: Cover the Boat
Drape the shrink wrap over the boat and secure it under your framework. Be sure to leave enough slack for shrinking later. This is where the extra film comes in handy.
Step 5: Seal the Bottom
Make sure to create a tight seal at the bottom edge of the shrink wrap. Use heat tape or a robust adhesive to secure the film to the boat, ensuring no gaps exist.
Step 6: Shrink the Wrap
Using the heat gun, gradually work your way around the entire boat. Start with the lower section, moving upwards, and keep the gun at a safe distance to avoid melting the wrap. Note that the wrap will shrink tightly, securing it in place.
Step 7: Finishing Touches
Inspect your wrapping for any loose areas. If necessary, reheat those spots to tighten up the fit. Trim off any excess shrink wrap while being cautious not to damage the wrap you’ve secured.
Expert Tips for Successful Boat Shrink Wrapping
To optimize your DIY experience, consider these expert tips for boat shrink wrapping:
1. Weather Conditions Matter
Always check the weather before you start the shrink wrapping process. Ideally, you should work on a sunny day with minimal wind. Cold temperatures can make the wrap brittle and difficult to work with.
2. Adequate Ventilation
When using a heat gun, ensure that you’re in a well-ventilated area to avoid the dangers of smoke inhalation and to prevent the wrap from overheating.
3. Don’t Rush the Process
Patience is key while shrink wrapping. Take your time ensuring every step is done correctly. A well-wrapped boat is worth the effort when it comes to protection.
4. Seek Help if Needed
If you’re new to boat shrink wrapping, don’t hesitate to ask for a helping hand. Having an extra set of hands will make the process easier and more efficient.
5. Practice Makes Perfect
If this is your first time, consider practicing on a smaller object before moving on to your boat. This way, you’ll become familiar with how the material behaves and the necessary techniques.
Conclusion: Taking Control of Your Boat’s Protection
Boat shrink wrapping is an invaluable skill for any boat owner wanting to protect their investment. By following the steps outlined in this article, along with the expert tips provided, you can ensure a successful DIY shrink wrapping experience. Remember, preparation and patience are key to achieving optimal results.
Now that you’re equipped with the knowledge to tackle boat shrink wrapping, why not get started today? Your boat deserves the best protection, and with this guide, you’re well on your way to mastering the art of shrink wrapping. Happy wrapping!